There’s an art to achieving that perfectly seared chicken breast-golden, juicy, and bursting with flavor-yet many home cooks find themselves caught in the trap of dry, unevenly cooked meat. What if the secret to culinary success lies not just in the ingredients or the pan, but in mastering the timing? In this article, we unveil the essential timing secrets that transform an ordinary chicken breast into a seared masterpiece.Prepare to elevate your cooking skills as we dive into the science and subtle rhythms behind that impeccable, mouthwatering crust you’ve been striving for.
perfectly Sear Chicken Breast: Timing Secrets Unveiled
Perfectly sear chicken breast is a cooking skill that transforms simple poultry into a culinary masterpiece. The enticing aroma of the golden-brown crust paired with the juicy, tender interior makes this technique a must-master for any home cook or food enthusiast. Rooted in classic culinary science, the art of searing is about controlling heat, moisture, and timing-a dance that, when done right, creates a symphony of texture and flavor on your plate.
prep and Cook Time
- Preparation: 10 minutes
- Cooking: 15 minutes
- Total Time: 25 minutes
Yield
Serves 2 generous portions
Difficulty Level
easy to Medium – perfect for cooks ready to elevate thier poultry game
Ingredients
- 2 boneless, skinless chicken breasts, about 6 ounces each
- 1 teaspoon kosher salt
- ½ teaspoon freshly ground black pepper
- 1 tablespoon olive oil, or avocado oil for higher smoke point
- 1 tablespoon unsalted butter (optional, for finishing)
- 1 garlic clove, smashed (optional)
- Fresh herbs like thyme or rosemary (optional, for aroma)
Instructions
- Prepare your chicken: Pat the chicken breasts dry with paper towels. Removing moisture is essential to achieve a superior crust. Season both sides evenly with kosher salt and black pepper to enhance natural flavors.
- Choose your pan wisely: Opt for a heavy-bottomed stainless steel or cast iron skillet-these retain and distribute heat evenly,key for a perfect sear. Avoid non-stick pans as they may prevent that coveted crust from forming.
- Heat the pan: Place the skillet over medium-high heat and add olive oil. Once the oil shimmers and just begins to smoke, it’s time to add the chicken. This preheating ensures instant caramelization upon contact.
- Sear the chicken: Lay the chicken breasts gently into the pan, leaving space between them. Resist the urge to move them immediately.Sauté until golden brown, about 5 to 7 minutes, allowing the Maillard reaction to develop a flavorful crust. Flip carefully using tongs.
- Control the heat for a crispy crust: After flipping, reduce the heat to medium. Add butter,garlic,and fresh herbs,if using,to the pan.Tilt the skillet to pool melted butter and baste the chicken with a spoon.This technique adds flavor depth and helps maintain moisture inside the breast.
- Timing is everything: Cook for another 5 to 7 minutes depending on thickness. Use an instant-read thermometer to check internal temperature-165°F (74°C) guarantees a juicy yet fully cooked result. Remove the chicken from the pan and let it rest for 5 minutes before slicing.
Tips for success
- Thickness matters: Pound chicken breasts to uniform thickness if uneven to ensure they cook evenly and quickly.
- Don’t overcrowd the pan: Overcrowding traps steam and prevents browning. Cook in batches if necessary.
- oil choice affects searing: Use oils with a high smoke point like avocado or grapeseed for best results.
- Resting is crucial: Always allow your chicken to rest uncovered to redistribute juices and maintain moistness.
- Make ahead: Sear chicken up to 2 days in advance. Reheat gently in a low oven or skillet to retain crispness.
Serving Suggestions
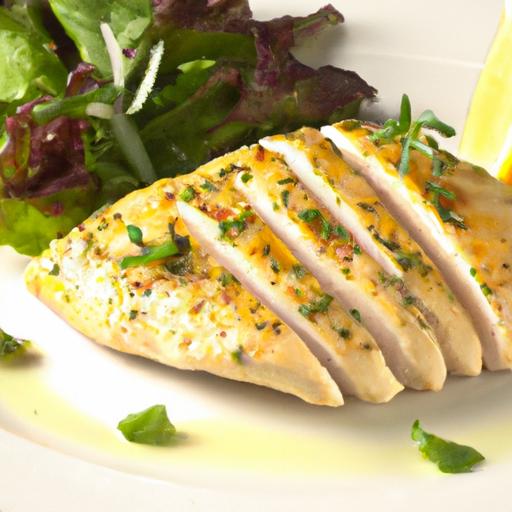
Present your perfectly seared chicken breast sliced against the grain to showcase the tender interior and golden crust. Drizzle with pan jus or a simple lemon-herb vinaigrette. Complement the dish with seasonal sautéed greens, creamy mashed potatoes, or a vibrant quinoa salad.Garnish with fresh herbs or a wedge of lemon for an inviting pop of colour and brightness.

Nutritional Data
| Nutrient | Per Serving |
|---|---|
| Calories | 280 kcal |
| Protein | 35 g |
| Carbohydrates | 0 g |
| Fat | 12 g |
Mastering the technique of perfectly sear chicken breast is about respecting the science behind heat control, pan selection, and timing. For more expert tips on poultry, check out our Ultimate Guide to Roasting Chicken. Dive deeper into the chemistry of searing with serious Eats for a detailed breakdown of the Maillard reaction and why it’s essential for flavor.

Q&A
Q&A: Perfectly Sear chicken Breast – timing Secrets Unveiled
Q1: Why is timing crucial when searing chicken breast?
A1: Timing is everything in searing chicken breast because it determines that golden crust and juicy interior we crave. Too short, and you miss the Maillard reaction-the magic browning that adds flavor. Too long, and you risk drying out the meat.Perfect timing locks in moisture while delivering that crave-worthy crisp finish.
Q2: How do I know when my chicken breast is ready to flip?
A2: Patience, the chef’s best friend! Wait until the chicken releases easily from the pan-this usually takes about 4 to 5 minutes on medium-high heat. If it’s sticking, it isn’t ready. That gentle release signals the formation of a flavorful crust beneath, making flipping a seamless move rather than a messy scramble.
Q3: Does the thickness of the chicken breast affect searing time?
A3: Absolutely. A thicker cut demands more patience-think closer to 6 minutes per side-while thinner breasts might need just 3-4 minutes. The secret? Use an instant-read thermometer aiming for an internal temperature of 165°F (74°C). This ensures safety without turning your chicken into leather.
Q4: Can I sear chicken breast straight from the fridge?
A4: For best results, let your chicken reach room temperature for about 15-20 minutes before searing.Cold meat can cause uneven cooking and longer sear times, risking dryness on the outside with rawness inside. Room temperature chicken sears more evenly, creating that perfect, golden crust every time.
Q5: What’s the ideal pan and oil to use for searing?
A5: A heavy-bottomed skillet-cast iron is king-retains and distributes heat evenly, vital for a consistent sear. Use oils with a high smoke point like avocado, grapeseed, or refined olive oil. These oils withstand the heat needed to create that lovely crust without burning and impart a subtle flavor boost.
Q6: Can I use marinades or spices without affecting sear timing?
A6: Yes, but tread lightly. Marinades with sugars or acidic components can caramelize quickly, potentially burning before the chicken is cooked thru. Patting your chicken dry before adding spices or searing helps. Adjust timing slightly if using a sugary glaze-lower the heat and watch closely for that perfect balance.
Q7: How do I finish cooking if the chicken breast is thick but the crust is perfect?
A7: After achieving that golden crust on the stovetop, transfer your skillet to a preheated oven at 375°F (190°C) for 5-8 minutes. This gentle oven finish cooks the interior evenly without sacrificing your sear’s crisp perfection-like a warm hug for your chicken breast.
Q8: What common timing mistakes should beginners avoid?
A8: The biggest time traps are flipping too soon and overcooking. Flipping early breaks the crust and causes sticking; overcooking turns juicy chicken dry and rubbery. Embrace patience, trust your timer, and rely on visual cues-the crust’s rich color and effortless release tell the true timing tale.
Q9: Any pro tips to seal the deal for the perfect sear?
A9: yes-always dry your chicken thoroughly before seasoning, preheat your pan fully before adding the oil, and resist the urge to move the chicken around. Let it develop that crust undisturbed. And remember: the clock is your ally, not your enemy.Master the timing, and you master the art of perfectly seared chicken breast.
To Conclude
Mastering the art of perfectly searing chicken breast isn’t just about heat and time-it’s a delicate dance of patience, technique, and understanding your ingredients. Now that the timing secrets have been unveiled, you’re equipped to transform a simple chicken breast into a succulent, golden masterpiece every single time. So next time you step into the kitchen, let these insights guide your pan and watch as ordinary chicken becomes extraordinary with just the right sear. Happy cooking!