There’s something undeniably captivating about duck breast-the rich, savory flavor, the tender yet crispy texture, and that beautiful, jewel-like sear that makes every bite feel special. Yet, mastering this culinary delight can be a daunting challenge for many home cooks. Achieving the perfect balance between crisp skin and succulent meat requires more than just good instincts; it demands a thoughtful approach to planning and technique. In this article, we’ll dive into essential prep tips that transform duck breast from a daunting ingredient into a showcase of culinary finesse, guiding you step-by-step toward a flawlessly cooked masterpiece. Whether you’re a seasoned chef or an adventurous foodie, get ready to unlock the secrets to cooking duck breast like a pro.
Mastering Duck Breast: Essential Prep Tips for Perfect cooking
Mastering duck breast is an art that marries rich, luscious flavors with irresistible textures. The intense, gamey taste of duck paired with its crispy skin offers a culinary experience like no other. Whether inspired by classic French bistros or your own kitchen creativity, understanding how to select and prepare duck breast is key to unlocking its full potential.
Prep and Cook Time
- preparation Time: 15 minutes
- Cooking Time: 12-15 minutes
- Total Time: 30 minutes
Yield
Serves 2 elegantly as a main course
Difficulty Level
Medium – perfect for home cooks ready to elevate their poultry game
Ingredients
- 2 duck breasts (about 6-7 oz each), skin on, trimmed
- 1 tsp sea salt
- ½ tsp freshly cracked black pepper
- 1 tsp smoked paprika (optional for depth)
- 1 tbsp olive oil or duck fat
- 2 sprigs fresh thyme
- 1 clove garlic, smashed
- 1 tbsp unsalted butter (optional, for basting)
Instructions
- Choosing the Right Duck Breast: Select breasts that are plump with a thick, even layer of fat beneath the skin. Look for a deep reddish-pink tone in the meat and creamy white fat that will render beautifully during cooking.
- Trimming and Scoring: Trim any excess fat from the edges, but keep the layer under the skin intact. Using a sharp knife, carefully score the skin in a crosshatch pattern about 1/4 inch apart-do not cut into the meat. This technique helps the fat render and ensures a crisp, crackling skin.
- Seasoning: Pat the breasts dry with paper towels. Generously season both sides with sea salt, black pepper, and smoked paprika if using. The salt enhances moisture retention and flavor intensity.
- Cooking – Skin Side First: Heat a heavy skillet over medium heat and add the olive oil or duck fat. Place duck breasts skin side down onc hot, pressing gently to maintain contact. Cook undisturbed for 6-8 minutes until the skin is deep golden brown and crisp.
- Flip and Finish: Turn breasts over and add thyme, garlic, and butter to the pan. Tilt the skillet and spoon melted butter and aromatics over the meat as it cooks for 4-6 minutes for medium-rare. Adjust timing for desired doneness.
- Resting: Transfer breasts to a warm plate, tent with foil, and rest for 5-7 minutes. This relaxes the meat fibers, preserving juiciness and tenderness.
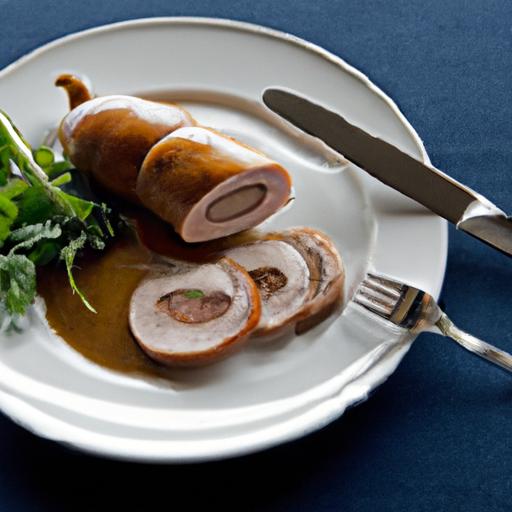
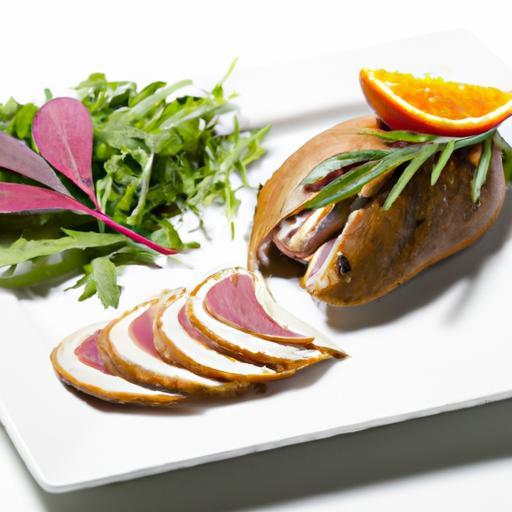
- Slicing and Serving: Slice the duck breasts thinly against the grain to reveal the beautiful rosy interior and arrange meticulously on your plate.
Chef’s Notes: Tips for Success
- Fat Rendering: Rendering duck fat thoroughly is essential. If unsure, gently press the skin during cooking to encourage even melting without burning.
- Scoring Caution: avoid cutting into the meat when scoring skin-this prevents juices from escaping during cooking.
- Seasoning Variations: For a hint of sweetness, mix a pinch of brown sugar or Chinese five-spice into your seasoning blend.
- Make Ahead: duck breasts can be seasoned and scored several hours ahead; keep refrigerated and bring to room temp before cooking.
- Doneness Check: A meat thermometer inserted should read 135°F (57°C) for medium-rare to maintain juicy texture.
Serving Suggestions
- Pair with a vibrant cherry or cranberry reduction to balance the richness of the meat.
- Accompany with seasonal roasted vegetables or creamy mashed potatoes for decadent contrast.
- Garnish with microgreens or fresh thyme sprigs for a final fresh note and visual appeal.
- For a refined plating, lay slices over a bed of wild rice or spiced lentils that soak up the flavorful duck fat.

| Nutrient | Per Serving |
|---|---|
| Calories | 450 kcal |
| Protein | 34g |
| Carbohydrates | 2g |
| Fat | 35g |
Ready to expand your culinary repertoire? Explore our classic roast duck recipes to complement your mastering duck breast skills.
For detailed duck selection tips from a trusted authority, visit Harvard’s nutrition guide on poultry.
Q&A
Q&A: Mastering Duck Breast – Essential Prep Tips for Perfect Cooking
Q1: Why is prepping duck breast different from other poultry?
A1: Unlike chicken or turkey, duck breast is richly marbled with fat beneath its skin, which makes prepping it a balancing act between rendering that luscious fat and achieving a crispy, golden crust without drying out the meat. It requires a bit of strategy to celebrate its unique texture and flavor.
Q2: What’s the first and most significant step before cooking?
A2: Scoring the skin is the game-changer. Using a sharp knife,gently score the fat in a crisscross pattern without cutting into the meat.This helps the fat render evenly during cooking and encourages that prized crispy, crackling skin that elevates duck breast to gourmet status.
Q3: should the duck breast be at room temperature before cooking?
A3: Absolutely! Letting the duck breast sit out for about 20-30 minutes helps it cook more evenly. A cold duck breast straight from the fridge can cause the skin to shrink unevenly and may result in uneven cooking.
Q4: Is seasoning important before cooking?
A4: Essential.Salt and pepper are your best friends here. Season the skin and meat generously. The salt not only enhances flavor but also assists in drawing out moisture, contributing to crispier skin.
Q5: What’s the ideal cooking method to master duck breast?
A5: Pan-searing is a classic technique. Start skin-side down on a cold pan, then gradually increase the heat to medium. This slow render of fat crisps the skin without burning it. Finish by flipping the breast to briefly sear the meat side, ensuring a juicy interior with a perfectly caramelized crust.
Q6: How can I tell when the duck breast is perfectly cooked?
A6: Aim for medium-rare to medium-about 135°F to 140°F internal temperature. The meat should have a blush of pink inside, tender and juicy. Overcooking risks drying it out and losing that succulent character.
Q7: What about resting the duck breast?
A7: Patience pays off. Let your duck breast rest for 5-10 minutes after cooking. This allows the juices to redistribute, locking in moisture and flavor with every slice.
Q8: Any final tips to elevate the dish?
A8: Definitely! Experiment with complementary flavors like orange glaze, cherry reductions, or a sprinkle of fresh herbs. The richness of duck pairs beautifully with bright and tangy accents that balance its bold personality.
Mastering duck breast is about respecting its fat, embracing slow and steady heat, and finishing with mindful rest. With thes prep tips in your culinary toolkit, you’re set to turn out restaurant-quality duck breast every time. Bon appétit!
Insights and Conclusions
With these essential prep tips tucked into your culinary toolkit, mastering duck breast is no longer a culinary challenge but an exciting adventure. From scoring the skin just right to seasoning with confidence and understanding the perfect cooking temperatures, each step brings you closer to that tender, juicy bite with irresistibly crispy skin.So, embrace the art of preparation, and let your next duck breast dish be a masterpiece that delights both the eyes and the palate. Happy cooking!