There’s an art to achieving that flawless, golden-brown crust on a chicken breast-one that promises juicy tenderness inside and a savory crunch outside. Yet, many home cooks find themselves caught in the tricky timing dance: too short on the stove, and the chicken turns out undercooked; too long, and it becomes dry and tough. In this article, we peel back the curtain on the science and technique behind perfectly pan-seared chicken breasts, revealing essential timing tips that will elevate your cooking game from guesswork to gourmet. Get ready to master the sizzling rhythm that transforms a simple chicken breast into a savory masterpiece.
Perfectly pan-seared chicken breast is a culinary marvel that transforms a simple protein into a golden, juicy delight. Achieving this balance turns on understanding how heat interacts with the meat and mastering every element from pan choice to resting time. Whether you’re a seasoned cook or just diving into stovetop techniques, this guide will elevate your weekday dinners to restaurant-quality plates, impressing family and friends alike with every succulent bite.
Prep and Cook Time
- Readiness: 10 minutes
- Cooking: 15 minutes
- Total: 25 minutes
Yield
Serves 2 generously (1 chicken breast per serving).
Difficulty Level
Easy to medium – perfect for home cooks looking to refine their pan-searing skills.
Ingredients
- 2 boneless, skinless chicken breasts (about 6 oz each, patted dry)
- 1 teaspoon kosher salt
- ½ teaspoon freshly ground black pepper
- 2 tablespoons high-smoke-point oil (such as avocado or grapeseed oil)
- 2 tablespoons unsalted butter
- 2 garlic cloves, smashed
- 1 sprig fresh thyme (optional but recommended for aroma)
Instructions
- Season both sides of the chicken breasts evenly with kosher salt and black pepper. Let them rest at room temperature for 10 minutes to ensure even cooking.
- Choose your pan wisely: Use a heavy-bottomed stainless steel or cast-iron skillet for the best heat retention and distribution, which is crucial for that perfect golden crust.
- Heat the pan over medium-high heat until shimmering but not smoking. Add the avocado oil, swirling to coat evenly. High-smoke-point oils prevent burning and keep the crust clean and crisp.
- Place the chicken breasts gently into the pan, laying them away from you to avoid oil splatter.Press lightly with a spatula to ensure full contact between the meat and pan surface.
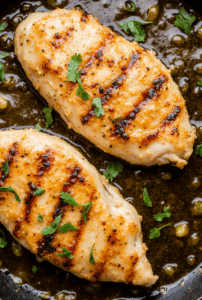
- Sear undisturbed for about 5-6 minutes, or until the underside develops a deep, golden-brown crust. Avoid moving the chicken during this stage to maximize Maillard reaction, which creates flavor and texture.
- Flip the chicken and add butter, smashed garlic, and thyme to the pan. As the butter melts, tilt the pan slightly and use a spoon to baste the breast continuously. This technique seals in moisture and adds richness.
- Reduce the heat to medium-low and continue cooking for another 5-7 minutes, or until the internal temperature reaches 155°F (68°C). Use a reliable instant-read thermometer to nail this precisely – overcooked chicken dries out quickly.
- Remove from heat and tent the chicken loosely with foil. Rest for 5-7 minutes to allow juices to redistribute, ensuring each bite remains juicy and tender.
Tips for Success
- Always pat your chicken dry before seasoning to encourage even browning.
- Do not overcrowd your pan – cooking in batches ensures even heat and prevents steaming.
- Use a thermometer to avoid guesswork; perfectly pan-seared chicken breast is juicy only when cooked precisely.
- For thicker breasts, consider lightly pounding to an even thickness for even cooking.
- Try adding fresh herbs like rosemary or sage during basting for varied flavor profiles.
- Make-ahead tip: You can cook the chicken breasts fully, cool, and refrigerate up to 2 days. Reheat gently in a covered skillet over low heat with a splash of broth.
Serving Suggestions
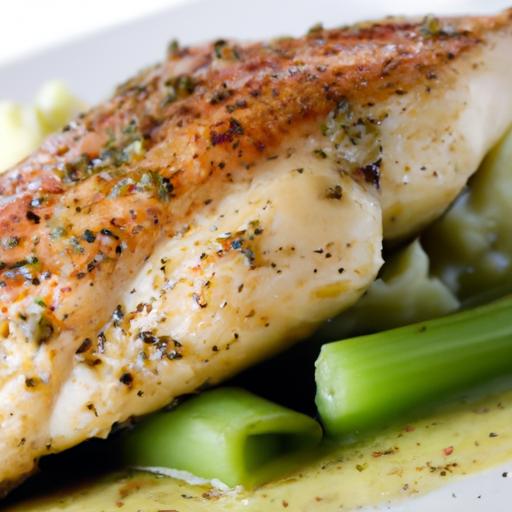
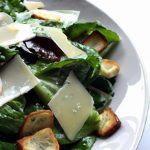
Present your golden chicken breast sliced against a bed of garlic mashed potatoes or a fresh arugula salad sprinkled with shaved Parmesan. garnish with a sprig of thyme and a lemon wedge to brighten flavors visually and on the palate. A drizzle of pan juices over the sliced chicken elevates the plate’s appeal and moisture retention.

| nutrient | Per Serving |
|---|---|
| Calories | 280 kcal |
| Protein | 40 g |
| Carbohydrates | 1 g |
| Fat | 10 g |
For further reading on the Maillard reaction and heat control, check out this excellent guide by serious Eats to deepen your kitchen chemistry knowledge.
Hungry for more? Discover our complementary guide on The Ultimate pan sauces for Chicken to perfectly complement your pan-seared chicken breast masterpieces.
Q&A
Q&A: Perfectly Pan-Seared Chicken Breast – Timing Tips Unveiled
Q1: Why is timing so crucial when pan-searing chicken breast?
A1: Timing is the secret ingredient to juicy, tender chicken and a golden, flavorful crust. Too short, and your chicken ends up rubbery and undercooked; too long, and it turns dry and tough. Perfect timing locks in moisture while creating that irresistible sear.
Q2: How long should I generally pan-sear a chicken breast?
A2: For a standard boneless, skinless chicken breast about 6-8 ounces, aim for 5-7 minutes per side over medium heat. Though, thickness varies, so use timing as a guideline – not a hard rule.
Q3: How do I know when to flip the chicken?
A3: Look for the edges turning opaque and the bottom developing a deep golden-brown crust. the chicken will naturally release from the pan when it’s ready to flip-a stuck breast means it needs a bit more time.Q4: Should I pound the chicken breast before cooking?
A4: Absolutely! Even thickness ensures even cooking and eliminates timing guesswork.Aim for about ½ to ¾ inch thickness, and your cooking time will be delightfully predictable.
Q5: Is it better to cover the pan or leave it open?
A5: Leaving the pan uncovered helps maintain that crispy crust. If you’re worried about undercooking,finish the chicken in a preheated oven for 3-5 minutes after searing.
Q6: Can I cut into the chicken to check doneness?
A6: Cutting releases juices and can dry out your chicken. Instead,use a meat thermometer-165°F (74°C) is the safe internal temperature for perfectly cooked chicken.
Q7: Any secret tips to elevate my pan-seared chicken?
A7: Yes! Rest your chicken for 5 minutes after cooking to let juices redistribute. Also, add a pat of herb butter or a squeeze of fresh lemon juice right after searing to boost flavor and that gourmet finish.Q8: What if my chicken breast is thicker or thinner than average?
A8: Adjust the timing accordingly-thicker breasts need a bit more time per side, while thinner ones cook faster. Use a thermometer and visual cues to guide you rather than the clock alone.
Q9: Can I marinate the chicken before pan-searing?
A9: Definitely! Marinating adds moisture and flavor, but pat the chicken dry before it hits the pan.Excess moisture steams the chicken instead of searing it, wrecking your golden crust.
Q10: What if my chicken breast sticks to the pan?
A10: Make sure your pan and oil are hot before adding the chicken. Use medium heat and resist the urge to move the breast too soon. A properly seared crust naturally releases when ready.
Unlock the magic of timing, and you’ll master the art of pan-seared chicken breast-crispy on the outside, tender and juicy on the inside, every single time!
In Conclusion
Mastering the art of the perfectly pan-seared chicken breast is less about luck and more about timing-the silent hero that transforms a simple cut of meat into a juicy, golden masterpiece. With these timing tips unveiled, you’re no longer guessing but confidently searing your way to dinner success. So next time you heat that skillet, remember: patience and precision are your best ingredients. Here’s to turning everyday chicken into extraordinary meals,one perfectly timed sear at a time.