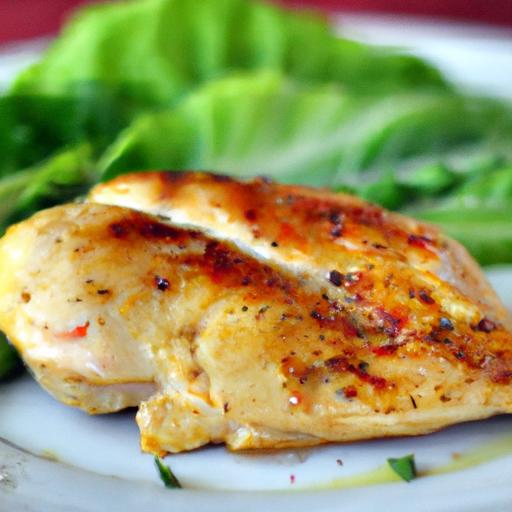
there’s an art to grilling the perfect chicken breast-one that’s juicy, tender, and bursting with flavor every time you fire up the flames. Too little time on the grill, and you’re left with undercooked poultry; too much, and you risk dry, flavorless meat that’s lost its charm. Mastering the timing of your grill sessions is the secret to unlocking that mouthwatering, succulent chicken breast that keeps friends and family coming back for more. In this article, we’ll break down the essential tips and precise timing techniques to help you achieve grilling perfection, ensuring your chicken breasts stay juicy and appetizing from the very frist bite.
Perfect Grill Chicken Breast Timing: Juicy Results every Time
Mastering perfect grill chicken breast timing unlocks the key to wonderfully juicy, tender, and flavorful chicken every time you fire up the grill. Whether you’re a backyard barbecue enthusiast or a weeknight dinner hero, understanding how time, temperature, and technique interplay is essential for grilling chicken breasts that never dry out or taste bland.
Understanding the Science Behind Grill Time and Temperature
Grilling chicken breasts to perfection is a delicate balancing act between heat and duration. The white meat of a chicken breast is lean and prone to drying out quickly if grilled too long or over too high heat. The ideal grill temperature ranges from medium to medium-high (about 350°F to 400°F),producing a stunning sear while allowing the inside to cook evenly.
Cooking chicken breast at this temperature zone helps the proteins coagulate just right, locking in moisture without toughening the meat fibers. keep in mind that thickness matters-thicker breasts require slightly longer grill time but still benefit from patience and steady heat rather than a quick char.
Choosing the Right Marinade and Its Impact on cooking Duration
Marinating does double duty: it boosts flavor and tenderizes the meat. Acids in marinades like lemon juice, vinegar, or yogurt gently break down proteins, which allows heat to penetrate more uniformly and can slightly shorten overall cooking time. However, marinate no longer than 2 hours for acidic blends to avoid mushy texture.
A marinade rich in oil, herbs, and spices creates a flavorful barrier that keeps moisture from evaporating during the grilling process. Lightly oiling your grill grate and brushing the chicken with marinade (or a glaze) mid-cook further enhances juiciness and caramelization.
Mastering the Flip: when and How to Turn for Maximum Juiciness
Knowing exactly when to flip your chicken breast is crucial to avoiding sticking, overcooking, or drying out. Flip the chicken only once-turning too frequently disrupts the cooking process and releases precious juices.After placing the breasts on the grill, wait 5 to 7 minutes until grill marks form and the edges begin to look cooked.
Use a thin, flexible spatula and gently lift one side to test; if it releases easily, its time to flip. Cook the second side for an additional 5 to 7 minutes, using an instant-read thermometer to check for an internal temperature of 165°F for safe consumption.
Resting Your Chicken Breast to Lock in Moisture and Flavor
Just as important as cooking is allowing the chicken breast to rest for 5 to 10 minutes after grilling. resting gives the muscle fibers time to relax and reabsorb their juices, ensuring every bite is moist and flavorful rather than dry and stringy. Tent the chicken loosely with foil during this period to keep it warm without steaming.
Prep and Cook Time
- Readiness Time: 10 minutes
- marinating Time: 1-2 hours (optional)
- Grilling Time: 12-14 minutes total
- Resting Time: 5-10 minutes
Yield
Serves 4 juicy chicken breasts
Difficulty Level
Easy – perfect for beginners but packed with expert tips
Ingredients
- 4 boneless, skinless chicken breasts (about 6 ounces each, patted dry)
- 1/4 cup olive oil
- 2 tablespoons fresh lemon juice
- 2 cloves garlic, minced
- 1 teaspoon smoked paprika
- 1 teaspoon kosher salt
- 1/2 teaspoon freshly ground black pepper
- 1 teaspoon dried oregano
- Optional: 1 tablespoon honey or maple syrup for a touch of sweetness
Instructions
- Prepare the marinade: In a medium bowl, whisk together olive oil, lemon juice, garlic, smoked paprika, salt, pepper, oregano, and honey (if using).
- Marinate the chicken: Place chicken breasts in a resealable plastic bag or shallow dish. Pour marinade over the chicken, coat evenly, and refrigerate for 1 to 2 hours. Remove from fridge 20 minutes before grilling to come to room temperature.
- Preheat the grill: Heat your grill to medium-high (350°F to 400°F). Clean and oil the grates to prevent sticking.
- Grill the chicken: Place the breasts on the grill. Leave untouched for 5 to 7 minutes until grill marks appear and the chicken naturally releases from the grill.
- Flip carefully: Use a thin spatula to flip the breasts gently.Cook for another 5 to 7 minutes, checking temperature with an instant-read thermometer aiming for 165°F internal.
- Remove and rest: Transfer chicken to a plate and tent loosely with foil.Rest for 5 to 10 minutes to ensure maximum juiciness.
- Slice and serve: Slice against the grain and garnish with fresh herbs or a wedge of lemon for brightness.
Tips for Success
- For even cooking, consider butterflying thicker chicken breasts or pounding them to uniform thickness.
- If using an outdoor charcoal grill, create two heat zones to sear and finish cooking with indirect heat.
- Use a reliable instant-read thermometer to avoid guesswork; visual cues alone can be misleading.
- Try swapping lemon juice for balsamic vinegar or soy sauce in your marinade for different flavor profiles.
- Leftover grilled chicken breasts store well and keep juices locked in when reheated gently in foil.
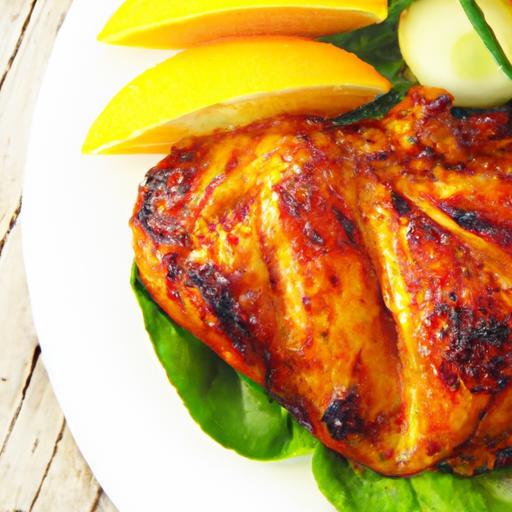
Serving Suggestions
Serve your perfectly grilled chicken breasts atop a bed of vibrant quinoa salad or alongside grilled seasonal vegetables for a colorful plate.A drizzle of garlic herb sauce or a sprinkle of crumbled feta adds an extra layer of indulgence. Don’t forget a fresh wedge of lemon or sprinkle of freshly chopped parsley to lift the flavors visually and palate-wise.

| Nutrient | Per Serving (1 Breast) |
|---|---|
| Calories | 220 kcal |
| Protein | 38 g |
| Carbohydrates | 2 g |
| Fat | 6 g |
For an in-depth guide on grilling techniques that complement chicken perfectly, check out our article on Ultimate Grilling Tips for Home cooks. To deepen your understanding of meat temperatures and safety,visit the USDA’s official resource on Safe Minimum Cooking Temperatures.
Q&A
Q&A: Perfect Grill Chicken Breast Timing – Juicy Results Every Time
Q1: Why is timing so crucial when grilling chicken breasts?
A: Timing is the secret ingredient to juicy grilled chicken! Too little time, and your chicken is undercooked and unsafe to eat. Too long, and it turns into dry, tough leather. Nail the timing, and you lock in flavor and moisture, transforming a simple chicken breast into a tender masterpiece.
Q2: What’s the ideal thickness of a chicken breast for grilling?
A: Aim for even thickness, about ¾ to 1 inch thick. If your chicken breasts are uneven, pound them gently to an even size. This ensures consistent cooking so the thinner parts don’t dry out before the thicker center is done.
Q3: How long should I grill chicken breasts on each side?
A: For a ¾ to 1-inch thick breast over medium-high heat (around 400°F), grill about 6-8 minutes per side. Keep the lid down to maintain heat, and resist the urge to constantly flip. One flip halfway through is your best bet.
Q4: How can I tell when the chicken is perfectly cooked without a thermometer?
A: Look for clear juices running from the meat and firm texture with a slight spring back when pressed. You can also slice into the thickest part – it should be opaque, not pink.However, a meat thermometer reading 165°F is the gold standard for safety and juiciness.
Q5: Should I marinate my chicken breast to improve grilling results?
A: Absolutely! A 30-minute to 2-hour marinade (think citrus, herbs, or yogurt-based) both infuses flavor and tenderizes the meat. Just don’t marinate too long,or the acids can begin to “cook” the chicken and make it mushy.
Q6: Is resting critically important after grilling?
A: Yes! Let your chicken rest for 5-10 minutes off the heat. this allows the juices to redistribute inside the meat rather than spilling out when you slice, giving you a moist, flavorful bite.
Q7: Can I grill frozen chicken breasts directly?
A: It’s best to thaw chicken breasts before grilling for even cooking and food safety. Grilling from frozen usually results in uneven cooking – the outside may burn while the inside stays raw.
Q8: Any tips for avoiding dryness?
A: Keep the grill temperature moderate, don’t overcook, use marinades or brines for moisture, pound chicken to even thickness, and always rest before slicing. With these simple hacks,dryness becomes a thing of the past!
Master these timing tips,and your grilled chicken breasts will be juicy,flavorful stars at every cookout. No more guessing games-just perfect, mouthwatering results every single time!
To Conclude
Mastering the perfect timing for grilling chicken breasts is your secret weapon to juicy, flavorful meals every time you fire up the grill. With a keen eye on the clock and a few simple techniques, you’ll transform what can frequently enough be a dry gamble into a reliably delicious success.Remember, it’s not just about hitting the heat-it’s about knowing when to pull back, rest, and savor the juicy rewards. So next time you light up the coals, grill smart, time it right, and watch your chicken breasts become the star of every backyard feast. Happy grilling!