Imagine a Saturday morning when the pantry is bare, but the week ahead demands rapid, nutritious snacks to fuel busy days. What if you could whip up not one, but 24 delicious granola bars in just minutes? Whether you’re packing lunches, prepping for hikes, or simply craving a wholesome treat, mastering the art of fast granola bar-making is a game-changer.in this article, we’ll unveil simple steps, clever shortcuts, and time-saving tips to help you create a batch of these crunchy, chewy delights with ease – no more waiting, no mess, just pure snack-time satisfaction!
If you’re looking to whip up a wholesome, energizing snack in no time, 24 granola bars in minutes is your go-to secret. These no-bake bars fuse crunchy oats, creamy nut butters, and just the right touch of sweetness to create a portable treat that’s as versatile as it is satisfying. Inspired by the need for quick, homemade nutrition on busy days, this recipe brings the perfect balance of convenience and flavor, letting you tailor each bar to your taste buds with fun add-ins while saving hours in the kitchen.
Prep and Cook Time
- Preparation: 10 minutes
- Setting Time: 30 minutes (no-bake refrigeration)
- Total Time: 40 minutes
Yield
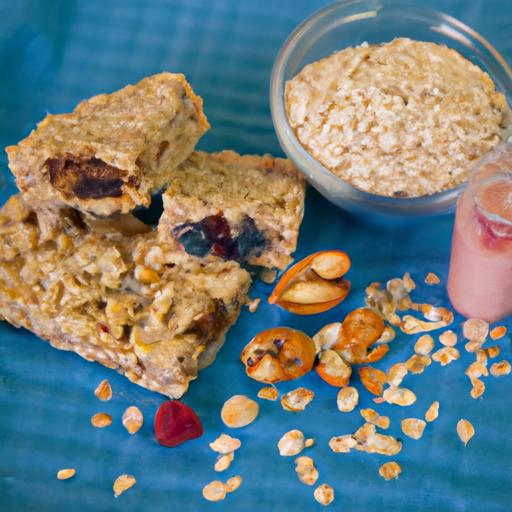
Approximately 24 bars (each about 2″ x 2″ square)
Difficulty Level
Easy – perfect for beginners and busy bakers alike
Ingredients
- 3 cups rolled oats (old-fashioned for best texture)
- 1 cup crunchy peanut butter or almond butter
- 1 cup honey or maple syrup (for a vegan option)
- 1 cup mini chocolate chips or chopped dark chocolate
- ½ cup chopped nuts (walnuts, pecans, or almonds)
- ½ cup dried fruit (cranberries, raisins, or chopped apricots)
- ½ tsp pure vanilla extract
- ¼ tsp fine sea salt
- Optional: 2 tbsp chia seeds or flaxseeds for extra nutrition
Instructions
- Warm the binding ingredients: In a medium saucepan over low heat, gently combine the peanut butter and honey. Stir continuously until the mixture becomes smooth and runny, about 3-4 minutes. Remove from heat and stir in the vanilla extract and sea salt.
- Mix the dry components: In a large mixing bowl,combine the rolled oats,chopped nuts,dried fruit,and chia seeds if using.Toss until evenly distributed.
- Combine wet & dry: Pour the warm peanut butter-honey mixture over the oat mixture. Use a sturdy wooden spoon or spatula to stir thoroughly until every oat and nut is coated and sticky.This will help bind the bars securely.
- Press into pan: line a 9×13 inch baking dish with parchment paper for easy removal. Transfer the mixture into the dish and press firmly with a spatula or your hands to create an even, compact layer. The firmer you press, the less crumbly your bars will be.
- Add the finishing touch: Sprinkle the mini chocolate chips evenly over the surface. Press lightly so they stick but don’t fully melt.
- Chill to set: Refrigerate the bars for at least 30 minutes until firm. Once set, lift the parchment paper out of the dish and transfer onto a cutting board.
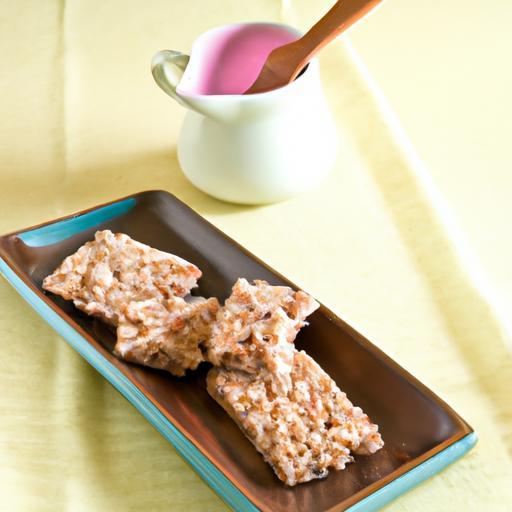
- Cut into bars: Use a sharp knife to slice into 24 equal squares. For clean cuts, wipe the knife blade between cuts.
- Enjoy instantly or store: See storage tips below to maintain maximum freshness and flavor!
Chef’s Notes: Tips for Success
- Nut Butter Swap: Feel free to use cashew or sunflower seed butter as allergy-amiable alternatives.
- Sweetness Level: Adjust honey or maple syrup based on your preferred sweetness. Less will yield chewier,less sticky bars.
- Crunch Factor: Toast your oats lightly for 5 minutes at 350°F before mixing to add a warm, toasty flavor.
- Custom Add-Ins: Experiment with shredded coconut, pumpkin seeds, or even a sprinkle of cinnamon – each is a flavor win.
- Make Ahead: Bars keep well refrigerated for up to 2 weeks or frozen for up to 3 months for on-the-go snacking.
Serving Suggestions
Granola bars are at their best when paired with fresh fruit or a glass of cold milk. For an energizing breakfast, crumble over yogurt or blend into a smoothie bowl topping. To elevate presentation, sprinkle lightly with sea salt flakes or drizzle with melted dark chocolate just before serving. The visual contrast of glossy chocolate against rustic oats is simply irresistible.

| Nutritional Info (per bar) | Calories | Protein | Carbs | fat |
|---|---|---|---|---|
| Average Granola Bar | 150 kcal | 4 g | 18 g | 7 g |
For more creative no-bake snacks, check out our No-Bake Dessert Recipes. For nutritional info on honey and nut butters, the USDA Food Composition Database is an invaluable resource.
Q&A
Q&A: 24 Granola Bars in Minutes? Hear’s How to Make Them fast!
Q1: Is it really possible to make 24 granola bars in just minutes?
A1: Absolutely! With the right ingredients, a streamlined method, and a bit of kitchen efficiency, you can whip up a batch of 24 delicious granola bars faster than you might expect. The secret is prepping everything at once and using quick-binding ingredients like honey or nut butter.
Q2: What’s the trick to speeding up the granola bar-making process?
A2: The key is simple: batch everything together. Use one large bowl to mix all your dry ingredients, and another for your wet mix. Combine,press into a baking pan,and you’re almost done. No individual shaping or fiddly molds required!
Q3: Can I customize the bars without slowing down the process?
A3: Definitely! Choose mix-ins you love-nuts, dried fruit, seeds, chocolate chips-and toss them all in during your dry ingredient mix. Keeping add-ins pre-measured and ready will keep your assembly line moving quickly.
Q4: What ingredients work best for quick binding?
A4: Honey, maple syrup, and nut butters (like peanut or almond) are your best friends. They stick everything together fast and add delicious flavor without needing extra cooking time.
Q5: Do I need to bake these granola bars?
A5: It depends on your recipe. Some bars taste great fresh and chilled,needing no baking at all,which saves time. Others may require a quick bake (15 minutes or less) to firm up. Either way, the total time remains minimal for a big batch!
Q6: How do I store these granola bars to keep them fresh?
A6: Once cooled, wrap bars individually or store them in an airtight container. They stay fresh in the fridge for up to two weeks, or freeze them for longer-lasting grab-and-go snacks.Q7: Can kids help make these quick granola bars?
A7: Yes! Mixing, pressing the mixture into the pan, and sprinkling toppings are fun, simple tasks for kids. It turns snack time into a creative family adventure with tasty results.
Q8: Any tips for making the bars less crumbly?
A8: Press the mixture firmly into the pan to help the ingredients stick together. Also,be generous with your binding agents like honey or nut butter-a little extra goes a long way to hold everything in place.
Q9: What if I don’t have all the usual granola bar ingredients on hand?
A9: No problem! Be creative. Use oats, nuts, seeds, dried fruit, and any sweet syrup or spread you have. The method is forgiving, so feel free to improvise and make it your own.Q10: Why make homemade granola bars instead of buying them?
A10: Homemade bars let you control the ingredients-no artificial preservatives, less sugar, and flavor combos tailored to your taste. Plus, they’re budget-friendly and fresh, giving you energy-boosting snacks whenever you need them!
Ready to blitz through your snack prep? Grab your mixing bowls, gather your favorite ingredients, and in minutes you’ll have 24 crave-worthy granola bars ready to fuel your busy days!
The Way Forward
There you have it-a simple, speedy solution to satisfy your snack cravings and fuel your busy days. Making 24 granola bars in minutes isn’t just a time-saver; it’s a way to customize your snacks with the flavors and ingredients you love most. Whether you’re gearing up for workouts, school lunches, or a quick pick-me-up, this fast method ensures you’ll always have a wholesome bite ready to go. So grab your mixing bowl, get creative with your add-ins, and enjoy the delicious reward of homemade granola bars-made fast, enjoyed slow. Happy snacking!