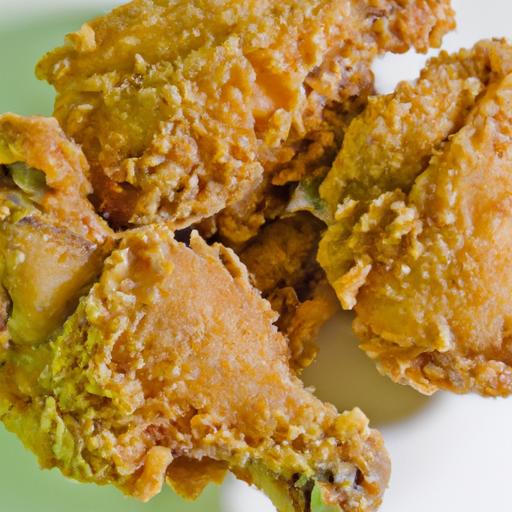


Few culinary delights evoke as much comfort and crave-worthy satisfaction as perfectly crispy fried chicken. That golden, crackling crust giving way to juicy, tender meat inside is a timeless combination that has captured hearts-and appetites-across cultures and kitchens. Yet achieving that flawless balance of crunch and succulence at home can feel like chasing a deliciously elusive dream. Fear not. This ultimate guide will unravel the secrets,techniques,and tips to transform your kitchen into a fried chicken haven. From marinade magic and coating craftsmanship to frying finesse, get ready to master the art of perfectly crispy fried chicken that rivals your favourite restaurant’s signature dish.
Selecting the perfect chicken cuts is the first crucial step toward creating irresistibly crispy fried chicken that delights with every bite. Opt for bone-in, skin-on pieces like thighs, drumsticks, or wings-these provide the ideal combination of juicy meat and that coveted crispy skin. The bone helps retain moisture during frying, yielding tender, flavorful results that elevate your dish beyond ordinary.
Mastering the Art of the Perfect Marinade and buttermilk Soak
Immersing your chicken in a buttermilk soak overnight is the secret weapon for tenderizing while infusing subtle tang. The acidity gently breaks down proteins, allowing the chicken to stay juicy beneath the crunch. Enhance your marinade with bold aromatics-garlic,smoked paprika,cayenne pepper,and a touch of honey create a harmonious blend of heat and sweetness. This marinade sets the stage for flavor penetration and a splendidly crispy crust.
Choosing the Right Coating for an Irresistible Crunch
The coating is your crispy crown. A dry mix of 1 cup all-purpose flour, ½ cup cornstarch, seasoned with salt, black pepper, garlic powder, and a pinch of cayenne, forms a delicate yet resilient barrier.Combining flour with cornstarch creates that sought-after shatter-crisp texture. For an extra-crunchy finish, double-dip your chicken: first flour, then back in the buttermilk, and flour again. This layering locks in moisture and adds deep textural complexity.
Frying Techniques and Temperature Tips for Golden Perfection
Maintaining consistent frying temperature is vital. Heat your oil to 350°F (175°C).Too hot, and the coating burns before the chicken cooks; too cool, and the crust absorbs oil, turning greasy. Use a candy or deep-fry thermometer to monitor the heat. Fry in batches, avoiding overcrowding which lowers oil temperature. Cook wings for about 8-10 minutes, thighs and drumsticks 12-15 minutes, turning occasionally for even browning.After frying, drain on a wire rack to keep the crust crisp.
Prep and Cook Time
- Prep Time: 20 minutes (plus 8-12 hours marinating)
- Cook Time: 40 minutes
Yield
- Serves 4-6 hungry guests
Difficulty Level
- Medium - time-intensive but straightforward
Ingredients
- 3 lbs bone-in, skin-on chicken pieces (thighs, drumsticks, wings)
- 2 cups buttermilk
- 1 tbsp smoked paprika
- 1 tsp garlic powder
- 1 tsp cayenne pepper
- 2 tsp salt
- 1 tbsp honey
- 1 cup all-purpose flour, sifted
- ½ cup cornstarch
- 1 tsp black pepper
- Vegetable oil, for frying (about 4 cups)
Instructions
- Prepare the marinade: In a large bowl, whisk together buttermilk, smoked paprika, garlic powder, cayenne pepper, honey, and 1 tsp salt. Add chicken pieces, ensuring they’re fully submerged. Cover and refrigerate for 8-12 hours.
- Make the coating: Combine flour, cornstarch, remaining salt, and black pepper in a separate shallow dish. Mix well to distribute seasoning evenly.
- coat the chicken: Remove chicken from marinade, letting excess drip off. Dredge each piece in the flour mixture, then dip back in the marinade briefly and dredge again for extra crunch. Place coated pieces on a wire rack for 15 minutes to set the crust.
- Heat the oil: Fill a deep skillet or Dutch oven with vegetable oil to a depth of 2-3 inches. Heat over medium-high heat until thermometer reads 350°F (175°C). Maintain this temperature throughout frying.
- Fry in batches: Carefully add chicken to oil, avoiding crowding. Fry wings 8-10 minutes, thighs and drumsticks 12-15 minutes. Turn occasionally for even browning. Use a thermometer to ensure internal chicken temperature reaches 165°F (74°C).
- Drain and rest: Remove chicken with a slotted spoon and place on a wire rack set over a baking sheet. Let rest 5 minutes to retain crispiness before serving.
Tips for Success
- Marinating time: Don’t skip the overnight soak-it’s essential for juicy meat and tangy flavor.
- Oil choice: Use neutral oils with high smoke points like peanut or canola.
- Temperature control: Keep a close eye on your oil thermometer; fluctuations cause soggy or burnt crust.
- Make ahead: Chicken can be marinated and coated ahead of time; refrigerate before frying to ease your workflow.
- Avoid sogginess: Never pile fried chicken on paper towels, which traps steam; always drain on a wire rack.
Serving Suggestions
Present your crispy fried chicken alongside vibrant sides such as a crunchy coleslaw, tangy pickles, or creamy mashed potatoes. Garnish with fresh herbs like chopped parsley or thyme for a burst of color and aroma. Pair with classic sauces-homemade honey mustard or spicy aioli-served in small ramekins for dipping adventure. A crisp cold beverage or classic lemonade completes the ultimate comfort feast.

| Nutrient | Per Serving (approx.) |
|---|---|
| Calories | 450 |
| Protein | 35g |
| carbohydrates | 15g |
| Fat | 25g |
For more expert tips on elevating your home fried chicken, check out our homemade fried chicken secrets article. To ensure your frying oil is always fresh and safe, read this extensive guide at FoodSafety.gov.
Q&A
Q&A: Ultimate Guide to Perfectly Crispy Fried chicken at Home
Q1: What’s the secret to getting fried chicken that’s crispy on the outside but juicy inside?
A1: The magic lies in layering moisture and crunch! Start with a buttermilk marinade to tenderize the chicken and infuse flavor. Then, coat it with a seasoned flour mixture that includes a bit of cornstarch or rice flour for extra crispiness. Double-dipping-dipping the chicken back into the buttermilk and then the flour again-creates that irresistible crunchy crust while locking in juicy goodness.
Q2: Can I skip marinating the chicken, or is it really necessary?
A2: While technically optional, marinating is your best friend for flavor and tenderness. Buttermilk’s acidity breaks down proteins, making the meat melt-in-your-mouth soft. Plus, it helps the flour coating stick better, building that crave-worthy crust you want on every bite.
Q3: What type of oil should I use for frying?
A3: Choose oils with a high smoke point like peanut, canola, or vegetable oil. these oils withstand the high frying temperatures (around 350°F/175°C) without burning, ensuring your chicken cooks evenly and crisps beautifully without off-flavors.
Q4: How do I know when the oil is at the perfect frying temperature?
A4: Use a kitchen thermometer for precision-350°F (175°C) is ideal. If you don’t have one, drop a small piece of batter in the oil: if it sizzles and rises to the surface quickly, the temperature’s right. Too hot? The coating will burn before cooking through; too cool? The chicken will soak up oil and get greasy.
Q5: Is double frying necessary for fried chicken?
A5: Double frying is a pro trick often used to amp up crisp factor-first at a moderate temperature to cook through, then again at a higher temp to finish golden and crunchy. For home cooks, a single fry done carefully with proper temperature control usually suffices to get deliciously crispy results.
Q6: How do I keep my fried chicken crispy after frying?
A6: Resist the urge to trap steam! place fried chicken on a wire rack over a baking sheet, not directly on paper towels or a plate, so air can circulate and moisture can escape. If keeping warm, pop it in a low oven (around 200°F/95°C) to maintain crispness without drying out.
Q7: What’s a good seasoning blend for the flour coating?
A7: Classic but customizable-start with salt, black pepper, paprika, garlic powder, onion powder, and a pinch of cayenne for heat. Feel free to add herbs like thyme or a dash of chili powder for an extra punch. Season generously because the flour layer is your flavor base!
Q8: Can I make fried chicken gluten-free?
A8: Absolutely! Swap regular flour for gluten-free all-purpose flour or use a mix of rice flour and cornstarch. Both give great crispiness without gluten, so you don’t have to sacrifice texture or taste.
Q9: What cuts of chicken work best for frying?
A9: Drumsticks,thighs,and wings are favorites for their moist meat and skin that crisps up nicely. Breasts can work,but be mindful not to overcook as they dry out faster. Bone-in pieces retain juiciness better during frying than boneless.
Q10: Any tips for clean-up after frying?
A10: Safety first-let the oil cool fully before handling. Strain the oil through a fine sieve if you plan to reuse it (up to 2-3 times max). Dispose of unwanted oil by pouring it into a sealed container-never down the drain.Keep your frying station tidy by wiping splatters as you go to save post-cook stress.
With these insights, your home-cooked fried chicken will go from everyday to legendary-crispy, juicy, and bursting with flavor every time!
In Retrospect
And there you have it-the ultimate roadmap to achieving perfectly crispy fried chicken right in your own kitchen. With the right techniques, a few insider tips, and a dash of patience, you can transform humble ingredients into golden, crunchy masterpieces that rival your favorite diners. So next time the craving strikes,channel your inner chef,embrace the sizzle,and savor every crispy,juicy bite. Your homemade fried chicken journey is just beginning-get ready to impress your taste buds and guests alike!